Subdomains are an effective way to organize and separate different sections or functionalities of your website. For example, you can create a subdomain for a blog, store, or forum under your primary domain (e.g., blog.example.com). If you’re looking to set up free and unlimited subdomains in WordPress, this guide will take you through the steps, from understanding the basics to implementation.
What Are Subdomains?
A subdomain is a subdivision of your main domain name that operates as an independent section of your website. For instance:
- Primary Domain:
example.com - Subdomain:
store.example.com
Subdomains are particularly useful for:
- Hosting different sections of a website (e.g., blogs, forums, or stores).
- Running multilingual versions of your site (e.g.,
fr.example.comfor French). - Testing environments for new features.
With WordPress and the right hosting provider, you can create unlimited subdomains at no extra cost.
Prerequisites for Creating Subdomains
Before diving into the setup process, ensure the following:
- Domain Ownership: You must own the primary domain name.
- Web Hosting Plan: Most hosting services allow unlimited subdomains, but confirm this with your provider.
- WordPress Installed: Your WordPress installation should be active on your primary domain.
Step 1: Access Your Hosting Control Panel
To create subdomains, you’ll need access to your hosting control panel (e.g., cPanel, Plesk, or any custom dashboard your host provides).
- Log in to your hosting account.
- Locate the Subdomains section, usually under the “Domains” menu.
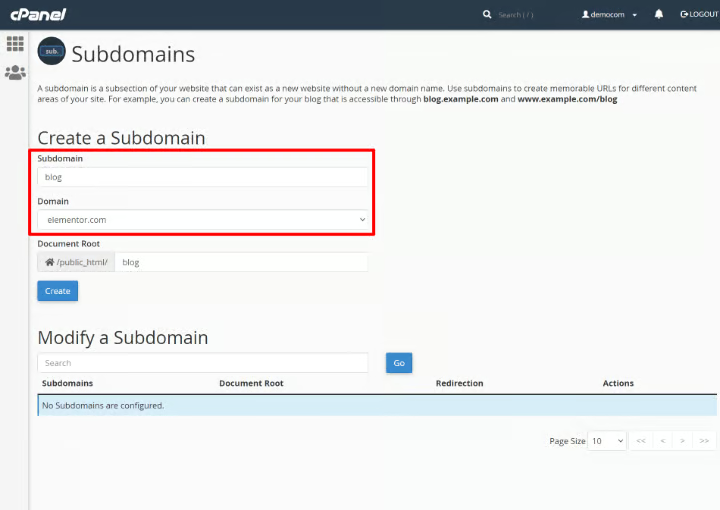
Step 2: Create a Subdomain
- In the Subdomains section of your hosting control panel:
- Enter the desired name for your subdomain (e.g.,
blog). - Choose the primary domain (e.g.,
example.com) from the dropdown list. - Specify the directory where files for the subdomain will be stored (usually auto-filled).
- Enter the desired name for your subdomain (e.g.,
- Click Create to set up the subdomain.
Your new subdomain (e.g., blog.example.com) will now be active and ready for use.
Step 3: Install WordPress on the Subdomain
You can either clone your existing WordPress site to the subdomain or install a fresh copy of WordPress.
Option 1: Fresh WordPress Installation
- Go to your hosting control panel and locate the WordPress Installer.
- Select the subdomain as the installation destination.
- Follow the on-screen instructions to complete the setup.
Option 2: Clone Your Existing WordPress Site
- Use a plugin like Duplicator or All-in-One WP Migration to export your main site.
- Install the plugin on your subdomain and import the files to replicate your site.
Step 4: Configure WordPress for Subdomains
If you’re using a multisite WordPress installation, follow these steps:
- Enable Multisite in WordPress:
- Open the
wp-config.phpfile via an FTP client or your hosting’s File Manager. - Add the following line before
/* That's all, stop editing! */:define('WP_ALLOW_MULTISITE', true); - Save the file and log in to your WordPress dashboard.
- Open the
- Set Up a Network:
- Go to Tools > Network Setup in your dashboard.
- Choose the subdomain option and configure the network details.
- Add Subdomains to the Network:
- After enabling the network, go to My Sites > Network Admin > Sites.
- Click Add New and enter the subdomain you want to add.
Step 5: Redirect Traffic if Necessary
If your hosting provider uses external DNS management, configure your subdomain in the DNS settings:
- Access your DNS manager.
- Add an A Record or CNAME Record pointing to your server’s IP address.
Step 6: Customize and Optimize Each Subdomain
Once your subdomain is live, you can customize it like a regular WordPress site. Install themes, plugins, and content specific to the subdomain’s purpose.
SEO Considerations for Subdomains
Each subdomain acts as a separate entity for search engines. To optimize them:
- Submit each subdomain to Google Search Console.
- Create unique meta tags and content.
- Generate sitemaps for each subdomain.
Benefits of Using Subdomains
- Organizational Clarity: Separate content types into distinct sections for easier management.
- Enhanced Branding: Use subdomains for specific campaigns or projects.
- Testing Ground: Experiment with features or designs without affecting the main site.
Drawbacks to Consider
- SEO Complexity: Managing multiple subdomains requires additional effort in SEO.
- Resource Allocation: Subdomains might require more server resources, depending on your hosting plan.
Free vs. Paid Subdomains
While subdomains themselves are free, certain limitations depend on your hosting provider:
- Free Hosting Plans: Often restrict the number of subdomains or don’t allow them.
- Paid Hosting Plans: Offer unlimited subdomains, making them more suitable for scaling.
Conclusion
Creating free and unlimited subdomains in WordPress is a straightforward process when you have the right hosting provider and tools. Subdomains offer flexibility and scalability, enabling you to expand your website’s functionality while maintaining organization. Whether you’re setting up a blog, store, or testing environment, subdomains can cater to diverse needs. With proper configuration, SEO optimization, and management, subdomains can significantly enhance your online presence.
By following the steps above, you can unlock the full potential of subdomains in WordPress—without breaking the bank!


Leave a Reply