Introduction
Connecting a custom domain to your Blogger (Blogspot) website is one of the best ways to establish a professional online presence. While Blogger provides free hosting with a blogspot.com subdomain, using your own domain (like www.yourblog.com) makes your site look more credible, improves branding, and can help with search engine optimization.
In this comprehensive guide, we’ll walk through all the steps needed to successfully connect your purchased domain to your Blogger website. Whether you bought your domain from Google Domains, GoDaddy, Namecheap, or any other registrar, this tutorial will help you make the connection properly.
Why Connect a Custom Domain to Blogger?
Before we dive into the technical steps, let’s understand why connecting a custom domain is beneficial:
- Professional Appearance: A custom domain (yourblog.com) looks more professional than a blogspot.com subdomain
- Brand Building: Helps establish and strengthen your brand identity
- SEO Benefits: Custom domains typically perform better in search rankings
- Portability: If you ever move away from Blogger, your domain can move with you
- Credibility: Builds trust with your audience and potential collaborators
- Email Addresses: Enables professional email addresses (contact@yourblog.com)
Prerequisites
Before you begin the domain connection process, make sure you have:
- An active Blogger/Blogspot account with a blog created
- A custom domain purchased from a domain registrar
- Access to your domain registrar’s DNS management panel
- About 30-60 minutes to complete the setup
- Patience – DNS changes can take up to 48 hours to fully propagate
Step 1: Purchase a Domain Name
If you haven’t already purchased a domain, you’ll need to do so from a domain registrar. Popular options include:
- Google Domains
- GoDaddy
- Namecheap
- Bluehost
- HostGator
- Domain.com
- Cloudflare Registrar
When choosing a domain name:
- Keep it short and memorable
- Make it relevant to your blog’s content
- Avoid numbers and hyphens if possible
- Consider the .com extension first, but other TLDs (.net, .org, .blog) work too
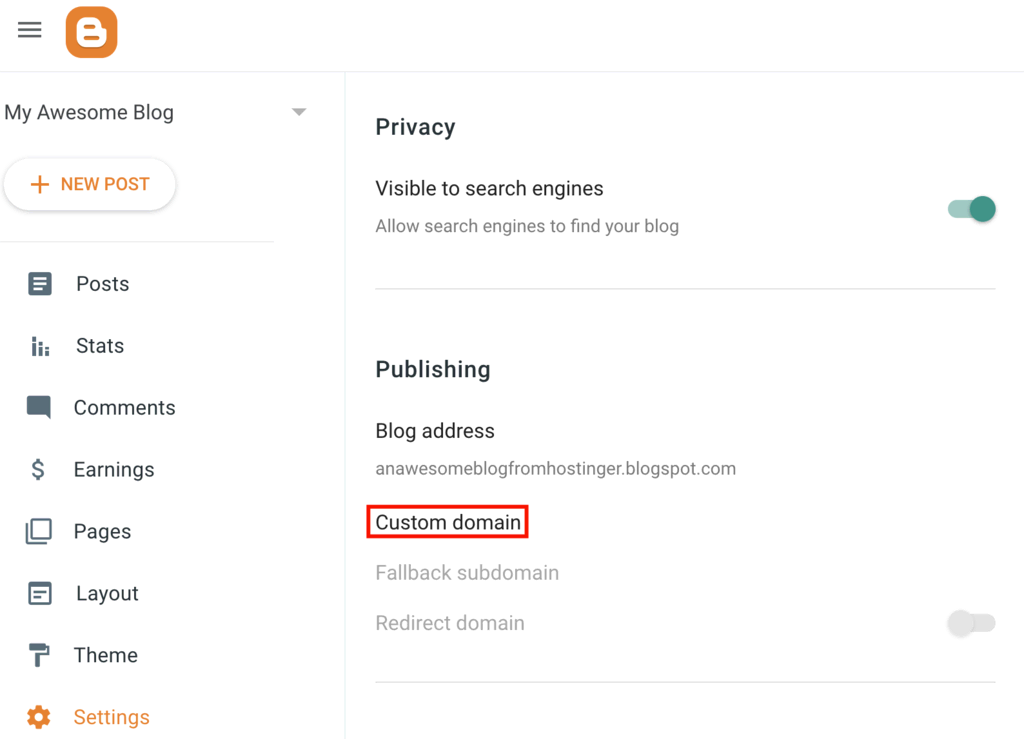
Step 2: Access Blogger Settings
- Log in to your Blogger account at blogger.com
- Select the blog you want to connect to your custom domain
- In the left sidebar, click on “Settings”
- Under the “Basic” tab, look for the “Publishing” section
- Click on “+ Setup a 3rd party URL for your blog”
Step 3: Enter Your Custom Domain
- In the field provided, enter your custom domain (e.g., www.yourblog.com)
- Check the “Redirect yourblog.com to www.yourblog.com” box (recommended)
- Click “Save”
- Blogger will now display two CNAME records you need to add to your domain’s DNS settings
Make note of these two records:
- A “Name” or “Host” and corresponding “Destination” for the first CNAME
- A second similar pair for verification
Step 4: Configure DNS Records at Your Domain Registrar
Now you’ll need to log in to your domain registrar’s website to add these DNS records. The exact steps vary by provider, but generally:
For Google Domains:
- Go to domains.google.com
- Select “Manage” next to your domain
- Click on “DNS” in the left menu
- Scroll to the “Custom resource records” section
- Add the two CNAME records provided by Blogger
- Also add these A records pointing to Blogger’s IP addresses:
- @ (or yourdomain.com) → 216.239.32.21
- @ (or yourdomain.com) → 216.239.34.21
- @ (or yourdomain.com) → 216.239.36.21
- @ (or yourdomain.com) → 216.239.38.21
- Save changes
For GoDaddy:
- Log in to your GoDaddy account
- Go to “My Products” and select “DNS” next to your domain
- In the “Records” section, add the two CNAME records from Blogger
- Also add the four A records with Blogger’s IPs (same as above)
- Save changes
For Namecheap:
- Log in to Namecheap
- Go to “Domain List” and click “Manage” next to your domain
- Select “Advanced DNS”
- Add the two CNAME records in the “Host Records” section
- Add the four A records for the root domain (@)
- Save all changes
Step 5: Verify DNS Configuration
After adding the DNS records:
- Return to your Blogger settings
- Click “Save” again in the Publishing section
- Blogger will attempt to verify the DNS records
- If successful, you’ll see a confirmation message
- If unsuccessful, wait a few hours and try again (DNS changes take time to propagate)
Step 6: Enable HTTPS (Recommended)
For security and SEO benefits:
- In Blogger Settings, go to the “Basic” tab
- Find the “HTTPS” section
- Set “HTTPS Availability” to “Yes”
- Save settings
- This may take a few hours to fully activate
Step 7: Test Your Domain Connection
After DNS propagation (typically 4-48 hours):
- Open a new browser window in incognito/private mode
- Visit your custom domain (www.yourblog.com)
- Verify your Blogger content loads correctly
- Check that the URL shows your domain (not blogspot.com)
- Test both the root domain (yourblog.com) and www version
Common Issues and Troubleshooting
Domain Not Redirecting Properly
- Double-check all DNS records were entered correctly
- Ensure you added both CNAME and A records
- Wait longer for DNS propagation (up to 48 hours)
SSL/HTTPS Not Working
- Make sure you enabled HTTPS in Blogger settings
- Clear your browser cache or try a different browser
- Wait up to 24 hours for SSL certificate provisioning
“Another Blog is Already Using This Address” Error
- This typically means the domain was previously connected to another Blogger blog
- Contact Blogger support if you can’t resolve this
Mixed Content Warnings
- Occurs when some resources load over HTTP instead of HTTPS
- Update any hard-coded links in your template to use HTTPS
Advanced Configuration Options
Setting Up Email with Your Domain
While this guide focuses on connecting your domain to Blogger, you might also want professional email addresses. Most domain registrars offer email forwarding or full email hosting services.
Configuring Subdomains
You can set up subdomains (like shop.yourblog.com) by creating additional CNAME records pointing to specific services.
Using Cloudflare
For improved performance and security:
- Sign up for a free Cloudflare account
- Change your domain’s nameservers to Cloudflare’s
- Configure DNS records in Cloudflare’s dashboard
- Enable their CDN and security features
Maintaining Your Domain Connection
Once set up, your domain connection should work continuously, but remember to:
- Renew your domain registration annually
- Keep your domain registrar account secure
- Monitor for any DNS changes that might affect your blog
- Update DNS records if Blogger changes their IP addresses
Migrating from Blogspot to Custom Domain Without Losing SEO
If your blog has been running on blogspot.com and has existing traffic:
- Set up the custom domain as described above
- In Blogger Settings, enable both “Redirect yourblog.com to www.yourblog.com” and “Redirect blogspot.com to your custom domain”
- Submit your new domain to Google Search Console
- Update any internal links to use the new domain
- Create 301 redirects if you’re changing URL structure
Conclusion
Connecting a custom domain to your Blogger website is a straightforward process that yields significant benefits for your online presence. By following these steps carefully and allowing time for DNS propagation, you can successfully migrate from a blogspot.com address to your own professional domain name.
Remember that while the technical setup might seem intimidating at first, millions of bloggers have successfully made this transition. If you encounter issues, most domain registrars have excellent support documentation, and the Blogger Help Community can provide additional assistance.
With your custom domain in place, you’ll have a more professional platform to grow your audience, establish your brand, and take your blogging to the next level.
Leave a Reply