

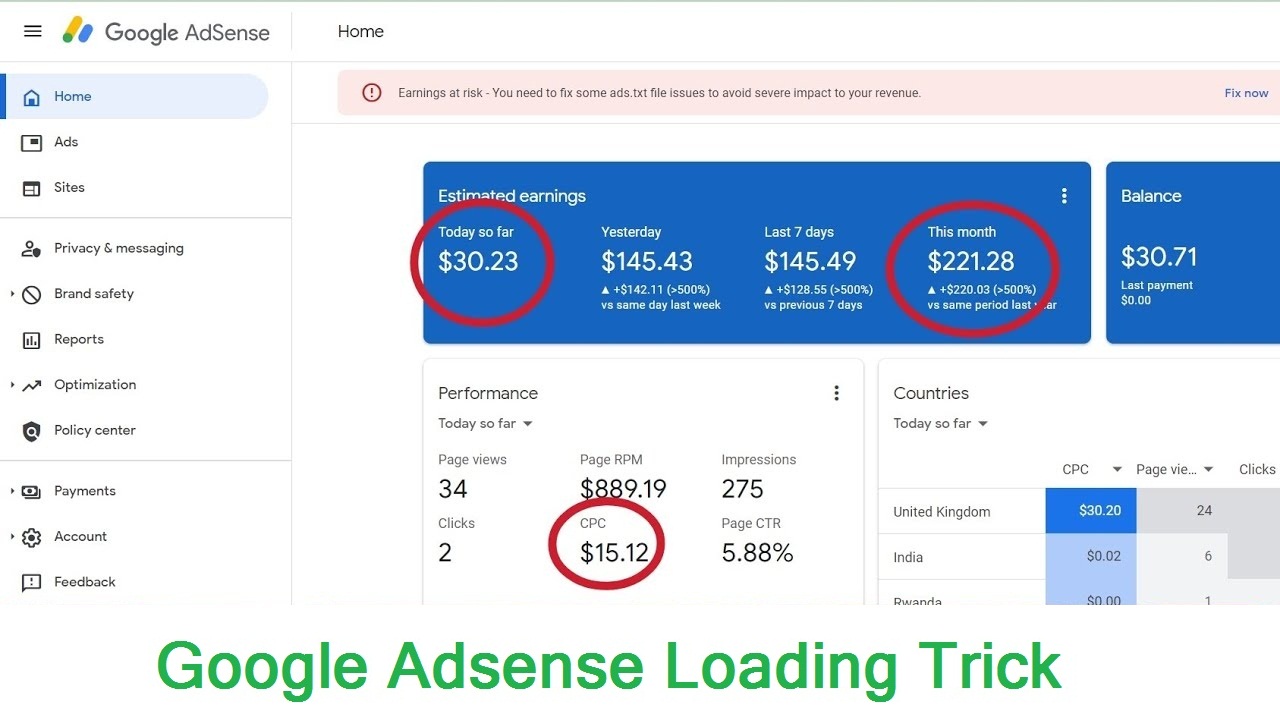
google adsense blog earnings
1. Publish the Blog on a Quality Website If you don’t already have a blog, here’s what you need: Then, publish the AdSense guide blog post on your site. Key...
Continue reading
boost adsense earnings with this safe method
How to Boost AdSense Revenue Safely in 2025: This comprehensive guide walks you through practical, ethical, and future-proof methods to boost your AdSense revenue in 2025—without risking penalties or bans....
Continue reading

From Jungle to Jumbotron: How to Create Viral AI Monkey Vlogs
Kathmandu, Bagmati Province, Nepal – June 16, 2025 – For centuries, the playful, intelligent, and often mischievous nature of monkeys has captivated humanity. From ancient folklore to modern-day wildlife documentaries,...
Continue reading

This Viral Yeti Vlog Was Made with AI — Here’s How You Can Do It Too
Kathmandu, Nepal – June 16, 2025 – The whispers about the Yeti have long captivated the imaginations of those who gaze upon the majestic, snow-capped peaks surrounding this very city....
Continue reading

You’re hitting on a very cutting-edge and exciting area of content creation! Combining the viral appeal of AI-generated characters with the power of sophisticated tools like Google Veo 3 and potentially leveraging platforms like BasedLabs.ai for specific enhancements can indeed be a recipe for success in 2025.
Here’s a detailed breakdown of how to create viral AI Yeti vlogs using Veo 3, with a nod to how BasedLabs.ai could complement your workflow: The New Era of AI...
Continue reading

How to Make a Yeti Vlog in 2025: Your Blueprint for Viral Content
How to Make a Yeti Vlog in 2025: Your Blueprint for Viral Content Sure, here is a long blog on “How to Make a Yeti Vlog on 2025: Viral Content”...
Continue reading

How to Make a Yeti Vlog on 2025: Viral Content
How to Make a Yeti Vlog in 2025: Your Blueprint for Viral Content (2000 Words) The year is 2025, and the digital landscape is more dynamic, more demanding, and frankly,...
Continue reading
How Do I Ask Gemini a Question?
Interacting with Google Gemini is designed to be intuitive and conversational, much like chatting with a human. Whether you’re using the web interface, a mobile app, or even integrating it...
Continue reading
How to Get ChatGPT Plus for Free as a Student?
The allure of ChatGPT Plus, with its enhanced capabilities, faster response times, and access to the more powerful GPT-4 model, is undeniable for students. However, unlike Google’s explicit free offer...
Continue reading
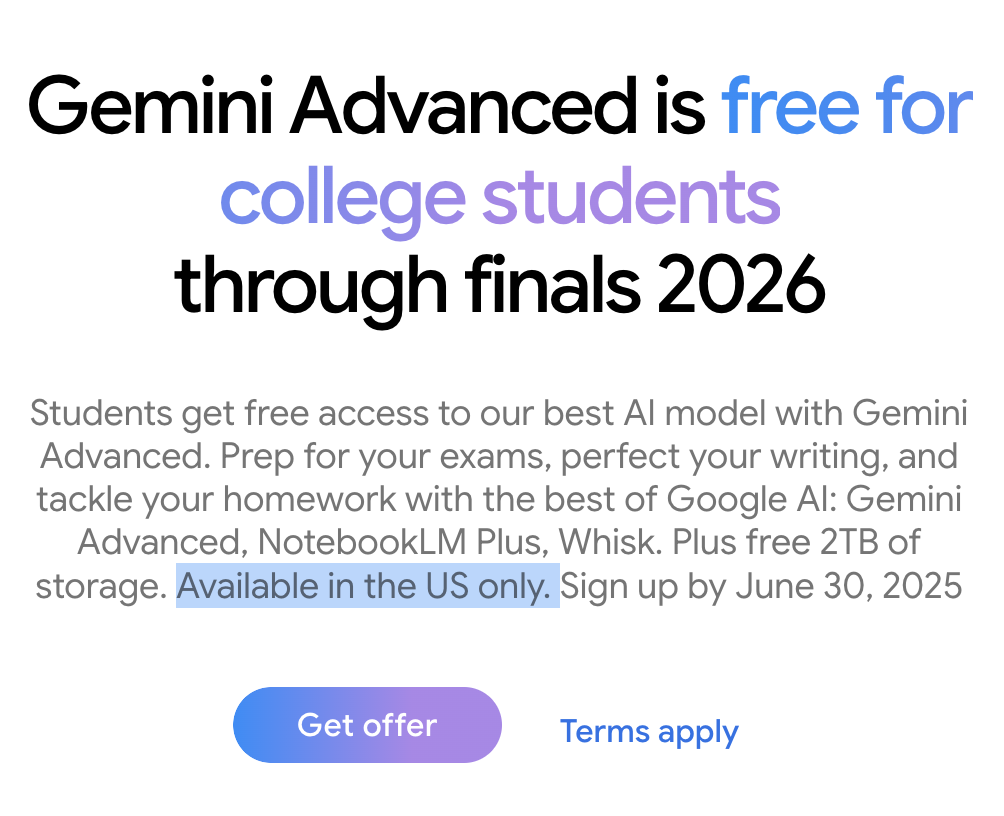
How to Get Gemini Pro for Free (Beyond Student Offers)
While the free Gemini Pro (Google One AI Premium) offer for eligible students is a fantastic opportunity, it’s not the only way to experience Google’s most advanced AI models without...
Continue reading