A Comprehensive Guide to Getting Approved for AdMob and AdSense: Tips, Strategies, and Best Practices

In the world of online monetization, Google AdMob and AdSense are two of the most popular platforms for publishers and app developers to generate revenue. AdMob is specifically designed for mobile apps, while AdSense is tailored for websites and blogs. Both platforms allow you to display targeted ads to your audience and earn money based on clicks, impressions, or other engagement metrics.

However, getting approved for AdMob or AdSense is not always straightforward. Google has strict policies and guidelines to ensure the quality of its advertising network, and many applicants face rejection due to common mistakes or oversights. In this article, we’ll explore everything you need to know about getting approved for AdMob and AdSense, including tips, strategies, and best practices to increase your chances of success.


Understanding AdMob and AdSense Approval Requirements

Before diving into the application process, it’s essential to understand the core requirements for both AdMob and AdSense. While the platforms serve different purposes (mobile apps vs. websites), their approval criteria share many similarities.

1. High-Quality Content

  • AdMob: Your app must provide value to users, be free of spammy or low-quality content, and comply with Google’s content policies. Apps with excessive ads, misleading functionality, or copied content are likely to be rejected.
  • AdSense: Your website or blog must have original, high-quality content that adheres to Google’s Webmaster Guidelines. Thin content, duplicate articles, or pages with little to no value will result in disapproval.

2. Compliance with Google’s Policies

Both AdMob and AdSense require strict adherence to Google’s policies, including:

  • Prohibited Content: Avoid content related to adult material, violence, hate speech, illegal activities, or copyrighted material.
  • User Experience: Ensure your app or website provides a positive user experience. This includes fast loading times, easy navigation, and no intrusive pop-ups or redirects.
  • Ad Placement: Follow Google’s ad placement policies. For example, don’t place ads too close to buttons or in a way that may confuse users.

3. Traffic and Engagement

  • AdMob: While there’s no strict traffic requirement, having an active user base and consistent engagement can improve your chances of approval.
  • AdSense: Google typically looks for websites with a decent amount of organic traffic and user engagement. New websites with little to no traffic may face rejection.

4. Technical Requirements

  • AdMob: Your app must be fully functional, free of bugs, and available on the Google Play Store or Apple App Store.
  • AdSense: Your website must have a professional design, be mobile-friendly, and use HTTPS for secure browsing.

Step-by-Step Guide to Applying for AdMob and AdSense

Now that you understand the requirements, let’s walk through the application process for both platforms.

Applying for AdMob

  1. Create a Google AdMob Account:
  • Visit the AdMob website and sign in with your Google account.
  • Click on “Start Now” and follow the prompts to set up your account.
  1. Add Your App:
  • Link your app to your AdMob account. If your app is already published on the Google Play Store or Apple App Store, you can search for it by name. If not, you’ll need to provide details about your app.
  1. Set Up Ad Units:
  • Create ad units for your app. AdMob offers various ad formats, including banner ads, interstitial ads, and rewarded ads. Choose the formats that best suit your app’s design and user experience.
  1. Integrate the AdMob SDK:
  • Download the AdMob SDK and integrate it into your app’s code. This step requires technical knowledge, so you may need to hire a developer if you’re not familiar with coding.
  1. Submit for Approval:
  • Once your app is live and the ad units are integrated, submit your app for review. Google will evaluate your app based on its content, functionality, and compliance with policies.

Applying for AdSense

  1. Create a Google AdSense Account:
  • Visit the AdSense website and sign in with your Google account.
  • Click on “Start Now” and fill out the application form with your website details.
  1. Verify Your Website:
  • Add the AdSense code to your website to verify ownership. This step ensures that you have control over the site you’re applying with.
  1. Submit for Approval:
  • Once your website is verified, submit your application. Google will review your site for compliance with its policies and content quality.

Common Reasons for Rejection and How to Avoid Them

Many applicants face rejection when applying for AdMob or AdSense. Here are some common reasons for disapproval and how to address them:

1. Low-Quality or Thin Content

  • Solution: Focus on creating original, high-quality content that provides value to your audience. Avoid copying content from other sources or publishing articles with little substance.

2. Non-Compliance with Policies

  • Solution: Familiarize yourself with Google’s policies and ensure your app or website adheres to them. Remove any prohibited content or features that may violate the guidelines.

3. Poor User Experience

  • Solution: Optimize your app or website for a seamless user experience. This includes improving loading times, ensuring mobile responsiveness, and avoiding intrusive ads.

4. Insufficient Traffic

  • Solution: If your website is new, focus on building traffic before applying for AdSense. Use SEO strategies, social media marketing, and other tactics to attract visitors.

5. Technical Issues

  • Solution: Test your app or website for bugs and errors before submitting your application. Ensure that all links work, the design is professional, and the site is secure (HTTPS).

Tips to Increase Your Chances of Approval

Here are some additional tips to improve your chances of getting approved for AdMob and AdSense:

1. Build a Strong Online Presence

  • For AdSense, having a well-established website with a history of quality content can work in your favor. Similarly, for AdMob, an app with positive reviews and a loyal user base is more likely to be approved.

2. Focus on Niche Content

  • Websites and apps that cater to a specific niche often perform better in terms of ad revenue and approval chances. Niche content tends to attract a more targeted audience, which is appealing to advertisers.

3. Use Professional Design

  • A clean, professional design reflects positively on your app or website. Avoid cluttered layouts, excessive ads, or outdated designs.

4. Monitor Your Analytics

  • Use tools like Google Analytics to track your traffic and user behavior. This data can help you identify areas for improvement and demonstrate your site’s performance during the application process.

5. Be Patient

  • The approval process can take time, especially for new apps or websites. Don’t get discouraged if you face rejection—use the feedback to make improvements and reapply.

What to Do After Approval

Once you’re approved for AdMob or AdSense, the work doesn’t stop there. Here are some steps to maximize your earnings and maintain compliance:

1. Optimize Ad Placement

  • Experiment with different ad formats and placements to find what works best for your audience. Avoid placing too many ads, as this can negatively impact user experience.

2. Monitor Performance

  • Use the AdMob or AdSense dashboard to track your ad performance. Analyze metrics like click-through rate (CTR), earnings per mille (EPM), and user engagement to identify trends and opportunities.

3. Stay Updated on Policies

  • Google frequently updates its policies, so it’s essential to stay informed. Regularly review the AdMob and AdSense policy pages to ensure ongoing compliance.

4. Diversify Your Revenue Streams

  • While AdMob and AdSense are excellent monetization tools, consider exploring other revenue streams, such as affiliate marketing, sponsored content, or selling digital products.

Conclusion

Getting approved for AdMob and AdSense requires careful planning, attention to detail, and a commitment to quality. By understanding the approval requirements, avoiding common pitfalls, and following best practices, you can increase your chances of success and start monetizing your app or website effectively.

Remember, the key to long-term success with AdMob and AdSense lies in providing value to your audience, maintaining compliance with Google’s policies, and continuously optimizing your content and ad strategy. With persistence and dedication, you can unlock the full potential of these powerful monetization platforms.

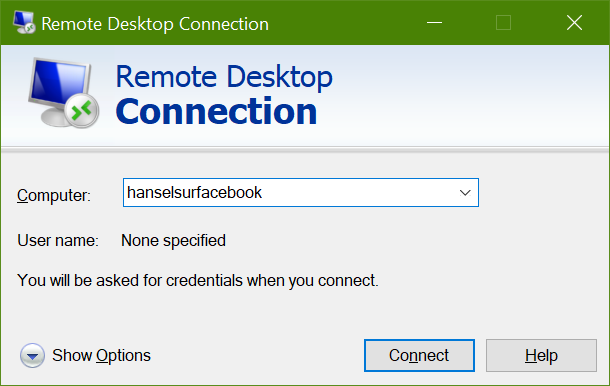
Make Your Own RDP Server in Microsoft Azure for Free || free rdp 

Creating your own RDP (Remote Desktop Protocol) server in Microsoft Azure for free is possible using Azure’s free tier offerings. While Azure typically requires a credit card for sign-up, you can use the free credits provided in the free tier to set up a virtual machine (VM) and configure RDP access. Below is a step-by-step guide to help you create your own free RDP server in Azure.


Step 1: Sign Up for Microsoft Azure Free Account

  1. Go to the Microsoft Azure Free Account page.
  2. Click on Start free.
  3. Sign up using your Microsoft account (or create one if you don’t have one).
  4. Provide the required details, including a phone number and credit card for identity verification.
  • Note: Azure requires a credit card to prevent abuse, but you won’t be charged if you stay within the free tier limits.
  1. Once signed up, you’ll receive $200 in free credits for 30 days and access to free services for 12 months.

Step 2: Create a Virtual Machine (VM)

  1. Log in to the Azure Portal.
  2. In the search bar, type Virtual Machines and select it.
  3. Click on Create and choose Azure virtual machine.

Configure the VM:

  • Subscription: Ensure you’re using the free trial subscription.
  • Resource Group: Create a new resource group or use an existing one.
  • Virtual Machine Name: Choose a name for your VM.
  • Region: Select a region close to you (some regions may not be available for free tier).
  • Image: Choose a free-tier eligible OS, such as Windows 10 Pro or Ubuntu Server.
  • Size: Select a free-tier eligible VM size, such as B1s (Burstable).
  • Note: The B1s VM is included in the free tier and provides 1 vCPU and 1 GB RAM.
  • Username and Password: Set up an admin username and password for the VM.
  • Public Inbound Ports: Allow RDP (3389) for Windows or SSH (22) for Linux.
  1. Click Review + Create, then Create to deploy the VM.

Step 3: Configure Network Security Group (NSG)

By default, Azure blocks inbound RDP traffic for security reasons. You’ll need to allow RDP traffic manually.

  1. Go to the VM you just created in the Azure portal.
  2. Under Settings, click on Networking.
  3. Click on Add inbound port rule.
  • Source: Any
  • Source port ranges: *
  • Destination: Any
  • Destination port ranges: 3389 (for Windows) or 22 (for Linux)
  • Protocol: TCP
  • Action: Allow
  • Priority: 100
  1. Save the rule.

Step 4: Connect to Your RDP Server

  1. Go to the VM in the Azure portal.
  2. Click on Connect and select RDP (for Windows) or SSH (for Linux).
  3. Download the RDP file (for Windows) or copy the SSH command (for Linux).
  4. Open the RDP file and enter the username and password you set up earlier.
  5. Click Connect, and you’ll be logged into your Azure VM.

Step 5: Optimize for Free Tier Usage

To avoid exceeding the free tier limits and incurring charges, follow these tips:

  • Use B1s VM Size: The B1s VM is included in the free tier and provides 750 hours of usage per month.
  • Stop/Deallocate the VM When Not in Use: Stop the VM from the Azure portal to avoid consuming free hours.
  • Monitor Usage: Regularly check your usage in the Azure portal to ensure you stay within the free tier limits.
  • Delete Unused Resources: Remove any resources you no longer need to avoid unnecessary charges.

Free Tier Limits to Keep in Mind

  • 750 Hours of B1s VM Usage: You can run a B1s VM for free for up to 750 hours per month.
  • 15 GB of Bandwidth: Free tier includes 15 GB of outbound data transfer per month.
  • 5 GB of Storage: Free tier includes 5 GB of standard storage.

Alternative: Use Azure for Students (No Credit Card Required)

If you’re a student, you can sign up for Azure for Students, which provides $100 in Azure credits and free services for 12 months without requiring a credit card.

Steps:

  1. Visit the Azure for Students page.
  2. Sign up using a valid school email address.
  3. Verify your student status.
  4. Follow the same steps above to create a VM and set up RDP.

Conclusion

By following this guide, you can create your own free RDP server in Microsoft Azure using the free tier. While Azure requires a credit card for sign-up, you won’t be charged if you stay within the free tier limits. Be sure to monitor your usage and optimize your resources to avoid unexpected charges.

If you’re unable to use Azure, consider exploring free alternatives like Google Cloud Platform, Oracle Cloud, or setting up a local VM using tools like VirtualBox. Always prioritize security and compliance when using cloud services.

azure rdp without credit card

Obtaining an Azure RDP (Remote Desktop Protocol) without a credit card is challenging because Microsoft Azure typically requires a payment method for identity verification and to prevent abuse of its free services. However, there are a few legitimate ways to access Azure RDP without providing credit card details. Below, I’ll outline some strategies and alternatives to help you achieve this.


1. Azure for Students (No Credit Card Required)

Microsoft offers a special program called Azure for Students, which provides $100 in Azure credits and free access to popular services for 12 months. Importantly, this program does not require a credit card for registration.

Steps to Use Azure for Students:

  1. Visit the Azure for Students page.
  2. Sign up using a valid school email address (e.g., ending in .edu).
  3. Verify your student status through Microsoft’s verification process.
  4. Once approved, you’ll gain access to $100 in Azure credits and free services.
  5. Create a virtual machine (VM) and configure RDP to connect remotely.

Note: This offer is only available to students aged 18 and older. If you don’t have a school email, you may not be eligible.


2. Use Azure Free Credits from Promotions

Microsoft occasionally runs promotions that provide free Azure credits without requiring a credit card. These promotions are often targeted at specific regions, user groups, or events.

How to Find Promotions:

  1. Follow Microsoft’s official social media channels, newsletters, and blogs.
  2. Participate in Microsoft-sponsored events, hackathons, or developer programs.
  3. Check websites like Reddit, GitHub, or tech forums for ongoing promotions.

3. Use Azure DevTest Labs

Azure DevTest Labs is a service designed for developers and testers to create VMs and other resources at a lower cost. Some organizations, educational institutions, or community programs provide access to DevTest Labs without requiring a credit card.

Steps to Access DevTest Labs:

  1. Check if your school, employer, or a community program offers access to Azure DevTest Labs.
  2. Request access and follow the instructions provided by the organization.
  3. Once granted access, create a VM and set up RDP.

4. Use Free Cloud Alternatives

If you’re unable to access Azure RDP without a credit card, consider using free alternatives that offer similar functionality. Some of these platforms may not require a payment method for their free tiers.

Free Cloud Platforms:

  • Google Cloud Platform (GCP): Offers a free tier with $300 in credits for 90 days (credit card required, but no charges if you stay within limits).
  • Oracle Cloud: Provides a free tier with no credit card required for certain services.
  • Amazon Web Services (AWS): Offers a free tier for 12 months (credit card required).
  • Heroku: Provides a free tier for hosting applications.

5. Use Local Virtual Machines

If your goal is to practice or experiment with RDP, you can set up a local virtual machine (VM) on your computer using free tools like VirtualBox or VMware Player. This approach doesn’t require any cloud services or payment methods.

Steps to Set Up a Local VM:

  1. Download and install VirtualBox (free and open-source).
  2. Download a free operating system image (e.g., Windows 10 Evaluation or Linux).
  3. Create a VM in VirtualBox and install the OS.
  4. Enable Remote Desktop (for Windows) or use SSH (for Linux) to connect to the VM.

6. Use Community or Educational Programs

Some community programs, non-profits, or educational initiatives provide free access to cloud resources, including Azure. Examples include:

  • Microsoft Imagine Cup: A global competition that often provides free Azure credits to participants.
  • GitHub Student Developer Pack: Includes free Azure credits for students.
  • Non-profit Programs: Microsoft offers discounted or free Azure credits for eligible non-profits.

How to Set Up RDP on Azure

If you gain access to Azure through one of the methods above, follow these steps to set up RDP:

  1. Create a Virtual Machine:
  • Log in to the Azure portal.
  • Navigate to “Virtual Machines” and click “Create.”
  • Choose a free-tier eligible VM (e.g., B1s Burstable VM).
  • Configure the VM settings (region, size, OS, etc.).
  1. Configure Network Settings:
  • Allow inbound RDP traffic (port 3389) in the network security group (NSG).
  1. Connect via RDP:
  • Download the RDP file from the Azure portal.
  • Open the RDP file and enter your VM’s credentials.
  • You’re now connected to your Azure VM!

Tips for Using Azure Responsibly

  • Monitor Usage: Keep track of your resource usage to avoid exceeding free tier limits.
  • Shut Down VMs When Not in Use: Stop or deallocate VMs to prevent unnecessary charges.
  • Use Automation: Use scripts to automate VM startup and shutdown.
  • Explore Free Services: Take advantage of Azure’s free services like App Service, Functions, and Cosmos DB.

Conclusion

While obtaining a free Azure RDP without a credit card is not straightforward, options like the Azure for Students program, promotions, and community programs can help you access Azure resources. If these methods don’t work for you, consider using free alternatives or setting up local virtual machines for RDP practice.

Always ensure you comply with the terms of service of any platform you use, and monitor your usage to avoid unexpected charges. With the right approach, you can leverage cloud resources for your projects without needing a credit card.

azure free rdp without credit debit card unlimited

Obtaining a free Azure RDP (Remote Desktop Protocol) without a credit or debit card and with unlimited access is not feasible through legitimate means. Microsoft Azure, like most cloud service providers, requires a payment method for identity verification and to prevent abuse of its free services. Additionally, Azure’s free tier has strict limits on usage, and unlimited access is not part of any free offering.

However, if you’re looking for long-term free access to Azure RDP or similar services without a credit or debit card, there are some workarounds and alternative approaches you can explore. Below, I’ll outline strategies to maximize free access and alternatives that might meet your needs.


1. Azure for Students (No Credit Card Required)

Microsoft’s Azure for Students program offers $100 in Azure credits and access to free services for 12 months without requiring a credit or debit card. While this is not unlimited, it provides a substantial amount of resources for free.

Steps to Use Azure for Students:

  1. Visit the Azure for Students page.
  2. Sign up using a valid school email address (e.g., ending in .edu).
  3. Verify your student status through Microsoft’s verification process.
  4. Once approved, you’ll gain access to $100 in Azure credits and free services.
  5. Create a virtual machine (VM) and configure RDP to connect remotely.

Note: This offer is only available to students aged 18 and older. If you don’t have a school email, you may not be eligible.


2. Use Azure Free Tier with Minimal Usage

Azure’s free tier includes 750 hours of B1S Burstable VM usage per month for the first 12 months. While this is not unlimited, you can maximize your usage by:

  • Stopping or deallocating VMs when not in use to avoid unnecessary consumption of free hours.
  • Using automation scripts to start and stop VMs as needed.

Steps to Set Up RDP on Azure Free Tier:

  1. Sign up for Azure’s free tier (credit/debit card required for verification).
  2. Create a B1S Burstable VM.
  3. Configure the VM to allow RDP traffic (port 3389).
  4. Connect to the VM using the RDP file provided in the Azure portal.

3. Use Azure DevTest Labs

Azure DevTest Labs is a service designed for developers and testers to create VMs and other resources at a lower cost. Some organizations, educational institutions, or community programs provide access to DevTest Labs without requiring a credit or debit card.

Steps to Access DevTest Labs:

  1. Check if your school, employer, or a community program offers access to Azure DevTest Labs.
  2. Request access and follow the instructions provided by the organization.
  3. Once granted access, create a VM and set up RDP.

4. Use Free Cloud Alternatives

If you’re unable to access Azure RDP without a credit or debit card, consider using free alternatives that offer similar functionality. Some of these platforms may not require a payment method for their free tiers.

Free Cloud Platforms:

  • Google Cloud Platform (GCP): Offers a free tier with $300 in credits for 90 days (credit card required, but no charges if you stay within limits).
  • Oracle Cloud: Provides a free tier with no credit card required for certain services.
  • Amazon Web Services (AWS): Offers a free tier for 12 months (credit card required).
  • Heroku: Provides a free tier for hosting applications.

5. Use Local Virtual Machines

If your goal is to practice or experiment with RDP, you can set up a local virtual machine (VM) on your computer using free tools like VirtualBox or VMware Player. This approach doesn’t require any cloud services or payment methods.

Steps to Set Up a Local VM:

  1. Download and install VirtualBox (free and open-source).
  2. Download a free operating system image (e.g., Windows 10 Evaluation or Linux).
  3. Create a VM in VirtualBox and install the OS.
  4. Enable Remote Desktop (for Windows) or use SSH (for Linux) to connect to the VM.

6. Use Community or Educational Programs

Some community programs, non-profits, or educational initiatives provide free access to cloud resources, including Azure. Examples include:

  • Microsoft Imagine Cup: A global competition that often provides free Azure credits to participants.
  • GitHub Student Developer Pack: Includes free Azure credits for students.
  • Non-profit Programs: Microsoft offers discounted or free Azure credits for eligible non-profits.

7. Use Free RDP Hosting Services

There are some free RDP hosting services available online, but these are often unreliable, insecure, or come with significant limitations. Be cautious when using such services, as they may compromise your privacy or security.

Examples of Free RDP Hosting Services:

  • EagleRDP: Offers free RDP hosting with limited resources.
  • GoormIDE: Provides cloud-based development environments with free tiers.
  • CloudSigma: Offers a free tier with limited resources.

8. Use Free Trials from Other Cloud Providers

If Azure is not an option, you can explore free trials from other cloud providers that offer RDP-like functionality. Some providers may not require a credit or debit card for their free trials.

Examples:

  • Google Cloud Platform (GCP): $300 in free credits for 90 days.
  • Oracle Cloud: Free tier with no credit card required for certain services.
  • AWS Free Tier: 12 months of free access to select services.

Important Considerations

  • No Truly Unlimited Free RDP: There is no legitimate way to get unlimited free RDP without some form of verification or payment method.
  • Security Risks: Be cautious when using free RDP services, as they may expose you to security vulnerabilities or data breaches.
  • Compliance: Always comply with the terms of service of any platform you use.

Conclusion

While obtaining a free Azure RDP without a credit or debit card and with unlimited access is not possible, you can maximize free resources through programs like Azure for Students, free tiers, and community programs. If these options don’t meet your needs, consider using free alternatives or setting up local virtual machines for RDP practice.

Always prioritize security and compliance when using cloud services, and monitor your usage to avoid unexpected charges. With the right approach, you can leverage free resources effectively for your projects.

azure free rdp without credit debit card

Getting a free Azure RDP (Remote Desktop Protocol) without using a credit or debit card can be challenging, as Microsoft Azure typically requires a payment method for identity verification and to prevent abuse of its free services. However, there are a few legitimate methods you can explore to access Azure RDP without providing credit or debit card details. Below, I’ll outline some strategies and alternatives.


1. Azure for Students Offer

Microsoft offers a special program called Azure for Students, which provides $100 in Azure credits and free access to popular services for 12 months. Importantly, this program does not require a credit or debit card for registration.

Steps to Use Azure for Students:

  1. Go to the Azure for Students page.
  2. Sign up using a valid school email address (e.g., ending in .edu).
  3. Verify your student status through Microsoft’s verification process.
  4. Once approved, you’ll gain access to $100 in Azure credits and free services.
  5. Create a virtual machine (VM) and configure RDP to connect remotely.

Note: This offer is only available to students aged 18 and older. If you don’t have a school email, you may not be eligible.


2. Use Azure Free Credits from Promotions

Microsoft occasionally runs promotions that provide free Azure credits without requiring a credit or debit card. These promotions are often targeted at specific regions, user groups, or events.

How to Find Promotions:

  1. Follow Microsoft’s official social media channels, newsletters, and blogs.
  2. Participate in Microsoft-sponsored events, hackathons, or developer programs.
  3. Check websites like Reddit, GitHub, or tech forums for ongoing promotions.

3. Use Azure DevTest Labs

Azure DevTest Labs is a service designed for developers and testers to create VMs and other resources at a lower cost. Some organizations, educational institutions, or community programs provide access to DevTest Labs without requiring a credit or debit card.

Steps to Access DevTest Labs:

  1. Check if your school, employer, or a community program offers access to Azure DevTest Labs.
  2. Request access and follow the instructions provided by the organization.
  3. Once granted access, create a VM and set up RDP.

4. Use Free Cloud Alternatives

If you’re unable to access Azure RDP without a credit or debit card, consider using free alternatives that offer similar functionality. Some of these platforms may not require a payment method for their free tiers.

Free Cloud Platforms:

  • Google Cloud Platform (GCP): Offers a free tier with $300 in credits for 90 days (credit card required, but no charges if you stay within limits).
  • Oracle Cloud: Provides a free tier with no credit card required for certain services.
  • Amazon Web Services (AWS): Offers a free tier for 12 months (credit card required).
  • Heroku: Provides a free tier for hosting applications.

5. Use Local Virtual Machines

If your goal is to practice or experiment with RDP, you can set up a local virtual machine (VM) on your computer using free tools like VirtualBox or VMware Player. This approach doesn’t require any cloud services or payment methods.

Steps to Set Up a Local VM:

  1. Download and install VirtualBox (free and open-source).
  2. Download a free operating system image (e.g., Windows 10 Evaluation or Linux).
  3. Create a VM in VirtualBox and install the OS.
  4. Enable Remote Desktop (for Windows) or use SSH (for Linux) to connect to the VM.

6. Use Community or Educational Programs

Some community programs, non-profits, or educational initiatives provide free access to cloud resources, including Azure. Examples include:

  • Microsoft Imagine Cup: A global competition that often provides free Azure credits to participants.
  • GitHub Student Developer Pack: Includes free Azure credits for students.
  • Non-profit Programs: Microsoft offers discounted or free Azure credits for eligible non-profits.

How to Set Up RDP on Azure

If you gain access to Azure through one of the methods above, follow these steps to set up RDP:

  1. Create a Virtual Machine:
  • Log in to the Azure portal.
  • Navigate to “Virtual Machines” and click “Create.”
  • Choose a free-tier eligible VM (e.g., B1s Burstable VM).
  • Configure the VM settings (region, size, OS, etc.).
  1. Configure Network Settings:
  • Allow inbound RDP traffic (port 3389) in the network security group (NSG).
  1. Connect via RDP:
  • Download the RDP file from the Azure portal.
  • Open the RDP file and enter your VM’s credentials.
  • You’re now connected to your Azure VM!

Tips for Using Azure Responsibly

  • Monitor Usage: Keep track of your resource usage to avoid exceeding free tier limits.
  • Shut Down VMs When Not in Use: Stop or deallocate VMs to prevent unnecessary charges.
  • Use Automation: Use scripts to automate VM startup and shutdown.
  • Explore Free Services: Take advantage of Azure’s free services like App Service, Functions, and Cosmos DB.

Conclusion

While obtaining a free Azure RDP without a credit or debit card is not straightforward, options like the Azure for Students program, promotions, and community programs can help you access Azure resources. If these methods don’t work for you, consider using free alternatives or setting up local virtual machines for RDP practice.

Always ensure you comply with the terms of service of any platform you use, and monitor your usage to avoid unexpected charges. With the right approach, you can leverage cloud resources for your projects without needing a credit or debit card.

free azure rdp without credit card

How to Get Free Azure RDP Without Credit Card: A Comprehensive Guide

Azure Remote Desktop Protocol (RDP) is a powerful tool that allows users to connect to virtual machines (VMs) hosted on Microsoft Azure. It’s widely used for development, testing, and remote work. However, many users are hesitant to sign up for Azure services because they require a credit card for registration, even for free trials. This guide will walk you through the process of obtaining a free Azure RDP without needing a credit card.


What is Azure RDP?

Azure RDP is a feature of Microsoft Azure that enables users to remotely access and control virtual machines hosted on Azure’s cloud platform. It’s commonly used for:

  • Software development and testing
  • Running resource-intensive applications
  • Remote work and collaboration
  • Learning and experimenting with cloud technologies

While Azure offers a free tier with limited resources, the requirement of a credit card for registration can be a barrier for some users. Below, we’ll explore legitimate ways to access Azure RDP without providing credit card details.


Why Does Azure Require a Credit Card?

Microsoft Azure requires a credit card for identity verification and to prevent abuse of its free services. Even though the free tier includes $200 in credits for 30 days and access to certain services for 12 months, the credit card is used to ensure that users are legitimate and to charge for any usage beyond the free limits.

However, there are ways to access Azure RDP without a credit card, as outlined below.


Methods to Get Free Azure RDP Without Credit Card

1. Use Azure for Students

Microsoft offers a free Azure for Students program that provides $100 in Azure credits and access to popular services for 12 months. Importantly, this program does not require a credit card for registration.

Steps to Sign Up:

  1. Visit the Azure for Students page.
  2. Sign in with your valid school email address (e.g., ending in .edu).
  3. Verify your student status through Microsoft’s verification process.
  4. Once approved, you’ll receive $100 in Azure credits and access to free services.
  5. Create a virtual machine (VM) and set up RDP to connect remotely.

Note: This offer is only available to students aged 18 and older.


2. Use Azure Free Tier with Virtual Credit Cards

If you don’t have a credit card, you can use a virtual credit card (VCC) to sign up for Azure’s free tier. Some VCC providers offer temporary card numbers that can be used for verification purposes.

Steps to Use a VCC:

  1. Sign up for a virtual credit card service (e.g., Privacy.com, Revolut, or Payoneer).
  2. Generate a temporary card number with a low balance (e.g., $1).
  3. Use this card number to sign up for Azure’s free tier.
  4. Once registered, you can create a VM and set up RDP.

Caution: Ensure that the VCC provider allows transactions with Microsoft Azure.


3. Use Azure Free Credits from Promotions

Microsoft occasionally runs promotions that offer free Azure credits without requiring a credit card. These promotions are often targeted at specific regions or user groups.

How to Find Promotions:

  1. Follow Microsoft’s official social media channels and newsletters.
  2. Check websites like Reddit, GitHub, or tech forums for ongoing promotions.
  3. Participate in Microsoft-sponsored events, hackathons, or developer programs that offer free Azure credits.

4. Use Azure DevTest Labs

Azure DevTest Labs is a service designed for developers and testers to create VMs and other resources at a lower cost. Some organizations and educational institutions provide access to DevTest Labs without requiring a credit card.

Steps to Access DevTest Labs:

  1. Check if your school, employer, or a community program offers access to Azure DevTest Labs.
  2. Request access and follow the instructions provided by the organization.
  3. Once granted access, create a VM and set up RDP.

5. Use Free Alternatives to Azure RDP

If obtaining Azure RDP without a credit card proves challenging, consider using free alternatives that offer similar functionality:

  • Google Cloud Platform (GCP): Offers a free tier with $300 in credits for 90 days (credit card required, but no charges if you stay within limits).
  • Amazon Web Services (AWS): Provides a free tier for 12 months (credit card required).
  • Oracle Cloud: Offers a free tier with no credit card required for certain services.
  • Heroku: Provides a free tier for hosting applications.
  • Vagrant and VirtualBox: Use these tools to create local virtual machines for free.

How to Set Up RDP on Azure

Once you’ve gained access to Azure through one of the methods above, follow these steps to set up RDP:

  1. Create a Virtual Machine:
  • Log in to the Azure portal.
  • Navigate to “Virtual Machines” and click “Create.”
  • Choose a free-tier eligible VM (e.g., B1s Burstable VM).
  • Configure the VM settings (region, size, OS, etc.).
  1. Configure Network Settings:
  • Allow inbound RDP traffic (port 3389) in the network security group (NSG).
  1. Connect via RDP:
  • Download the RDP file from the Azure portal.
  • Open the RDP file and enter your VM’s credentials.
  • You’re now connected to your Azure VM!

Tips for Using Azure RDP Responsibly

  • Monitor Usage: Keep track of your resource usage to avoid exceeding free tier limits.
  • Shut Down VMs When Not in Use: Stop or deallocate VMs to prevent unnecessary charges.
  • Use Automation: Use scripts to automate VM startup and shutdown.
  • Explore Free Services: Take advantage of Azure’s free services like App Service, Functions, and Cosmos DB.

Conclusion

While Microsoft Azure typically requires a credit card for registration, there are legitimate ways to access Azure RDP without one. By leveraging programs like Azure for Students, virtual credit cards, or free promotions, you can enjoy the benefits of Azure’s cloud services. If these options don’t work for you, consider exploring free alternatives to Azure RDP.

Remember to use Azure resources responsibly and monitor your usage to avoid unexpected charges. With the right approach, you can harness the power of Azure RDP for your projects without the need for a credit card.

How to Create Free Window RDP Server 2024 | How to Setup CLUB VPS Free Trial Window

How to Create a Free Windows RDP Server in 2024: A Step-by-Step Guide

Creating a free Windows RDP (Remote Desktop Protocol) server can be a cost-effective way to access a remote Windows environment for development, testing, or personal use. In 2024, several platforms offer free trials or limited free tiers that allow you to set up a Windows RDP server without incurring significant costs. One such platform is CLUB VPS, which provides a free trial for Windows VPS hosting. In this guide, we’ll walk you through the process of setting up a free Windows RDP server using CLUB VPS or similar services.


What is CLUB VPS?

CLUB VPS is a hosting provider that offers Virtual Private Server (VPS) solutions, including Windows-based VPS plans. They provide a free trial period, allowing users to test their services before committing to a paid plan. This makes it an excellent option for setting up a free Windows RDP server for a limited time.


Steps to Create a Free Windows RDP Server Using CLUB VPS

Step 1: Sign Up for a CLUB VPS Free Trial

  1. Visit the CLUB VPS website (https://www.clubvps.com).
  2. Look for their free trial offer or promotional plans. These are often available on the homepage or under the “Special Offers” section.
  3. Create an account by providing your email address and other required details.
  4. Verify your email address to activate your account.

Step 2: Choose a Windows VPS Plan

  1. After signing up, navigate to the VPS hosting plans.
  2. Select a plan that includes Windows Server as the operating system. Look for the free trial or promotional plan if available.
  3. Choose the desired configuration (CPU, RAM, storage, etc.). Note that free trials may have limited resources.

Step 3: Deploy the Windows VPS

  1. Once you’ve selected a plan, proceed to the deployment page.
  2. Choose the data center location closest to you for better performance.
  3. Select Windows Server 2022 or the latest version available as the operating system.
  4. Complete the deployment process. This may take a few minutes.

Step 4: Access Your Windows VPS via RDP

  1. After deployment, you’ll receive an email with the login credentials for your Windows VPS, including:
  • IP address
  • Username
  • Password
  1. On your local computer, open the Remote Desktop Connection application:
  • On Windows: Press Win + R, type mstsc, and press Enter.
  • On macOS: Download the Microsoft Remote Desktop app from the App Store.
  1. Enter the IP address of your VPS in the Remote Desktop Connection window.
  2. Click Connect and enter the username and password provided in the email.
  3. Once connected, you’ll have full access to your Windows RDP server.

Step 5: Configure Your Windows RDP Server

  1. After logging in, you can customize the server to suit your needs:
  • Install necessary software (e.g., web servers, databases, development tools).
  • Configure firewall settings to allow RDP connections.
  • Set up user accounts and permissions.
  1. Ensure that your server is secure by enabling Windows Defender or installing third-party antivirus software.

Alternative Methods to Create a Free Windows RDP Server

If CLUB VPS is not available or doesn’t meet your needs, here are some alternative methods to create a free Windows RDP server:

1. Cloud Providers with Free Tiers

  • Microsoft Azure: Offers a free account with $200 in credits for the first 30 days. You can use this to create a Windows Server instance.
  • Amazon Web Services (AWS): Provides a free tier with 750 hours of Windows Server usage per month for 12 months.
  • Google Cloud Platform (GCP): Offers $300 in free credits for new users, which can be used to set up a Windows Server.

2. Free RDP Hosting Websites

  • Websites like RDPHostings.com or FreeRDP.net offer free RDP hosting with limited resources. However, these services may come with ads or usage restrictions.

3. Set Up Your Own RDP Server

  • If you have a spare computer or server, you can install Windows Server and configure it as an RDP server. This requires a valid Windows Server license.

Tips for Using Free Windows RDP Servers

  1. Monitor Usage: Free trials and plans often have usage limits. Keep track of your usage to avoid unexpected charges or service interruptions.
  2. Backup Data: Regularly back up your data, as free services may not guarantee data retention.
  3. Secure Your Server: Use strong passwords, enable firewalls, and keep your server updated to protect against security threats.
  4. Upgrade to Paid Plans: If you find the free plan insufficient, consider upgrading to a paid plan for better performance and reliability.

Conclusion

Creating a free Windows RDP server in 2024 is possible using platforms like CLUB VPS or cloud providers with free tiers. By following the steps outlined in this guide, you can set up a Windows RDP server for development, testing, or personal use without incurring significant costs. However, always be mindful of the limitations and risks associated with free services, and consider upgrading to a paid plan if your needs grow.

Whether you choose CLUB VPS or another provider, a free Windows RDP server can be a valuable tool for remote access and experimentation.

free rdp hosting with window server

Free RDP Hosting with Windows Server: A Comprehensive Guide

Remote Desktop Protocol (RDP) is a powerful tool that allows users to connect to a remote computer or server over a network connection. It is widely used for remote administration, virtual desktops, and accessing applications hosted on remote servers. For many users, especially developers, IT professionals, and businesses, having access to a Windows Server with RDP capabilities is essential. However, setting up and maintaining a Windows Server can be costly, which is why free RDP hosting services are an attractive option.

In this article, we will explore the concept of free RDP hosting with Windows Server, its benefits, limitations, and how to find reliable free RDP hosting services. We will also discuss the potential risks and alternatives to free RDP hosting.


What is Free RDP Hosting?

Free RDP hosting refers to services that provide users with remote access to a Windows Server environment without charging any fees. These services typically offer a limited set of resources, such as CPU, RAM, and storage, but allow users to connect to the server via RDP to perform tasks like software development, testing, or running applications.

Free RDP hosting is often provided by cloud service providers, hosting companies, or developers who want to offer a free tier for users to test their services. However, it is important to note that free RDP hosting usually comes with restrictions, such as limited usage time, reduced performance, or fewer features compared to paid plans.


Benefits of Free RDP Hosting

  1. Cost Savings: The most obvious benefit of free RDP hosting is that it eliminates the need to pay for a Windows Server license or hosting fees. This is particularly useful for individuals or small businesses with limited budgets.
  2. Accessibility: Free RDP hosting allows users to access a Windows Server environment from anywhere, as long as they have an internet connection. This is ideal for remote work, collaboration, or accessing resources on the go.
  3. Testing and Development: Developers and IT professionals can use free RDP hosting to test applications, run scripts, or experiment with new software without affecting their local systems.
  4. Learning and Training: Free RDP hosting is a great way for students and beginners to learn about Windows Server administration, remote desktop management, and other IT-related skills.
  5. No Long-Term Commitment: Since free RDP hosting is typically offered on a trial or limited basis, users can try out the service without committing to a long-term contract.

Limitations of Free RDP Hosting

While free RDP hosting offers several advantages, it also comes with significant limitations:

  1. Limited Resources: Free RDP hosting plans often provide minimal CPU, RAM, and storage, which may not be sufficient for resource-intensive tasks.
  2. Usage Restrictions: Many free RDP hosting services impose restrictions on usage time, bandwidth, or the number of concurrent connections.
  3. Lack of Support: Free plans usually do not include technical support, so users are on their own if they encounter issues.
  4. Security Risks: Free RDP hosting services may not have robust security measures in place, making them vulnerable to attacks or data breaches.
  5. Unreliability: Free services are often less reliable than paid ones, with potential downtime or sudden termination of the service.
  6. Ads and Limitations: Some free RDP hosting providers may display ads or impose other limitations to monetize their services.

How to Find Reliable Free RDP Hosting Services

Finding a reliable free RDP hosting service can be challenging, as many providers offer limited or low-quality services. Here are some tips to help you find a trustworthy option:

  1. Research Providers: Look for reputable cloud service providers or hosting companies that offer free tiers. Examples include Amazon Web Services (AWS), Microsoft Azure, and Google Cloud Platform (GCP), which provide free trials or credits for new users.
  2. Check Reviews: Read reviews and testimonials from other users to gauge the reliability and performance of the service.
  3. Evaluate Features: Compare the features offered by different providers, such as CPU, RAM, storage, and bandwidth, to ensure they meet your needs.
  4. Look for Transparency: Choose a provider that is transparent about its terms of service, usage limits, and security measures.
  5. Test the Service: Take advantage of free trials or demo accounts to test the service before committing to it.

Popular Free RDP Hosting Options

Here are some popular options for free RDP hosting:

  1. Amazon Web Services (AWS) Free Tier: AWS offers a free tier that includes 750 hours of Windows Server usage per month for up to 12 months.
  2. Microsoft Azure Free Account: Azure provides a free account with $200 in credits for the first 30 days, which can be used to create a Windows Server instance.
  3. Google Cloud Platform (GCP) Free Tier: GCP offers a free tier with $300 in credits for new users, which can be used to set up a Windows Server.
  4. Oracle Cloud Free Tier: Oracle Cloud provides a free tier with limited resources, including access to Windows Server instances.
  5. Free RDP Hosting Websites: Some websites specialize in offering free RDP hosting, such as RDPHostings.com and FreeRDP.net. However, these services often come with significant limitations and may not be as reliable as major cloud providers.

Risks of Free RDP Hosting

While free RDP hosting can be useful, it is important to be aware of the potential risks:

  1. Security Vulnerabilities: Free RDP hosting services may lack proper security measures, making them susceptible to hacking or data breaches.
  2. Data Privacy: Your data may not be secure on free RDP hosting platforms, and some providers may even collect and sell user data.
  3. Malware and Viruses: Free RDP hosting services may not have adequate malware protection, putting your system at risk.
  4. Service Termination: Free services can be discontinued at any time, leaving you without access to your data or applications.
  5. Performance Issues: Free RDP hosting services often have limited resources, which can result in slow performance or frequent downtime.

Alternatives to Free RDP Hosting

If free RDP hosting does not meet your needs, consider these alternatives:

  1. Paid RDP Hosting: Paid RDP hosting plans offer more resources, better performance, and reliable support. Popular providers include AWS, Azure, and GCP.
  2. Virtual Private Servers (VPS): A VPS provides a dedicated virtual machine with full control over the operating system and applications. Many VPS providers offer affordable plans with Windows Server options.
  3. Dedicated Servers: For high-performance requirements, a dedicated server provides exclusive access to hardware resources.
  4. Local RDP Setup: If you have the necessary hardware, you can set up your own RDP server using a Windows Server license.

Conclusion

Free RDP hosting with Windows Server can be a valuable resource for individuals and businesses looking to save costs or test new applications. However, it is important to carefully evaluate the limitations and risks associated with free services. For more demanding or critical tasks, investing in a paid RDP hosting plan or alternative solution may be a better option.

When choosing a free RDP hosting provider, prioritize reliability, security, and transparency. By doing so, you can make the most of free RDP hosting while minimizing potential drawbacks.

where to get free hosting and domain?

Here’s a detailed, approximately 2000-word article on where to get free hosting and domain services, along with their pros, cons, and alternatives. This article is designed to provide a comprehensive guide for anyone looking to build a website on a budget.


Where to Get Free Hosting and Domain: A Complete Guide

In today’s digital-first world, having a website is almost a necessity. Whether you’re a blogger, entrepreneur, or hobbyist, a website can help you share your ideas, showcase your work, or even start an online business. However, the costs associated with domain names and hosting services can be a barrier for many. Fortunately, there are free options available for those who are just starting out or have limited budgets. This article explores where to get free hosting and domain services, their benefits and limitations, and whether they are the right choice for your needs.


What Are Free Hosting and Domain Services?

Before diving into where to find these services, it’s important to understand what they are:

  1. Free Hosting: Free hosting services provide server space to host your website without charging a fee. These services are often supported by ads or have limited features compared to paid hosting.
  2. Free Domain: A free domain is typically a subdomain (e.g., yoursite.freehost.com) or a domain with less common extensions like .tk, .ml, or .ga. These are provided by companies that offer free domain registration services.

While free hosting and domain services can help you get started, they often come with trade-offs. Let’s explore where you can find them and what to expect.


Where to Get Free Hosting Services

Several platforms offer free hosting services, each with its own set of features and limitations. Here are some of the most popular options:

1. InfinityFree

  • Features: InfinityFree offers unlimited disk space and bandwidth, making it a popular choice for beginners. It also supports PHP, MySQL, and includes a free subdomain.
  • Limitations: The service does not provide email accounts, and customer support is limited to a community forum.
  • Best For: Personal projects, small blogs, or testing websites.

2. 000WebHost

  • Features: 000WebHost provides 1 GB of bandwidth and 300 MB of disk space. It supports WordPress and other CMS platforms.
  • Limitations: The free plan displays ads on your website and lacks advanced features like SSL certificates.
  • Best For: Beginners looking to experiment with website building.

3. FreeHostingNoAds

  • Features: As the name suggests, this service offers free hosting without ads. It includes 1 GB of bandwidth and 5 GB of disk space.
  • Limitations: The resources are limited, and the service is best suited for small, static websites.
  • Best For: Simple websites or portfolios.

4. GitHub Pages

  • Features: GitHub Pages is a free hosting service for static websites. It’s ideal for developers who want to showcase their projects or host documentation.
  • Limitations: Only static websites (HTML, CSS, JavaScript) are supported. No server-side scripting is allowed.
  • Best For: Developers and tech-savvy users.

5. Wix (Free Plan)

  • Features: Wix offers a free plan with 500 MB of storage and 500 MB of bandwidth. It includes a drag-and-drop website builder and a free subdomain.
  • Limitations: The free plan displays Wix ads and does not allow custom domains.
  • Best For: Beginners who want an easy-to-use website builder.

Where to Get Free Domain Services

Free domain services are less common than free hosting, but they do exist. Here are some platforms that offer free domains:

1. Freenom

  • Features: Freenom provides free domain names with extensions like .tk, .ml, .ga, .cf, and .gq. You can register a domain for free for up to 12 months.
  • Limitations: These domain extensions are less professional and may not inspire trust among users.
  • Best For: Personal projects or temporary websites.

2. Dot.tk

  • Features: Dot.tk offers free .tk domains, which are popular for short-term projects or personal use.
  • Limitations: Like Freenom, .tk domains are not ideal for professional websites.
  • Best For: Hobbyists or those testing website ideas.

3. Free Subdomains from Hosting Providers

  • Many free hosting providers, such as InfinityFree and 000WebHost, offer free subdomains (e.g., yoursite.freehost.com). While these are not custom domains, they are free and easy to set up.

Pros and Cons of Free Hosting and Domain Services

Before choosing free hosting and domain services, it’s important to weigh their pros and cons.

Pros:

  • Cost-Effective: Free services are ideal for those with limited budgets.
  • Easy to Use: Most free hosting providers offer user-friendly tools and interfaces.
  • Great for Learning: Free services are perfect for beginners who want to learn how to build and manage websites.
  • No Long-Term Commitment: Free plans allow you to experiment without financial risk.

Cons:

  • Limited Resources: Free hosting plans often come with restricted storage, bandwidth, and features.
  • Ads and Branding: Many free hosting providers display ads on your website or include their branding.
  • Lack of Professionalism: Free domains and hosting are not ideal for businesses or professional websites.
  • Security Risks: Free services may lack robust security measures, making your site vulnerable to attacks.
  • No Customer Support: Free plans typically do not include customer support, leaving you to troubleshoot issues on your own.

When to Use Free Hosting and Domain Services

Free hosting and domain services are best suited for:

  • Personal Projects: If you’re creating a website for fun or as a hobby, free options may be sufficient.
  • Testing and Learning: Free hosting is great for testing new ideas or learning how to build websites.
  • Temporary Websites: If you need a website for a short period, free services can be a cost-effective solution.

However, if you’re running a business, building a professional portfolio, or planning to scale your website, investing in paid hosting and a custom domain is highly recommended.


Alternatives to Free Hosting and Domain Services

If free options don’t meet your needs, consider these affordable alternatives:

  1. Shared Hosting: Shared hosting plans from providers like Bluehost, Hostinger, or SiteGround are cost-effective and offer better performance and features.
  2. Free Domain with Paid Hosting: Many hosting providers offer a free custom domain for the first year when you sign up for a paid plan.
  3. Website Builders: Platforms like Wix, Squarespace, and Weebly offer affordable plans that include hosting and a custom domain.

Conclusion

Free hosting and domain services are a great way to get started online without spending money. They are ideal for personal projects, testing, or temporary websites. However, they come with significant limitations, including lack of professionalism, limited resources, and security risks. For businesses or professional websites, investing in paid hosting and a custom domain is the better choice.

By understanding where to get free hosting and domain services and their pros and cons, you can make an informed decision that best suits your needs. Whether you choose free or paid services, the key is to start building your online presence and sharing your ideas with the world.


This article provides a comprehensive guide to free hosting and domain services, helping readers decide whether they are the right choice for their website needs.

can i get free domain and hosting

Certainly! Below is a detailed article of approximately 2000 words on the topic of free domain and hosting, covering what they are, how to get them, their pros and cons, and alternatives for those looking to build a website.


Can You Get Free Domain and Hosting? A Comprehensive Guide

In today’s digital age, having an online presence is essential for individuals, businesses, and organizations. Whether you’re starting a blog, showcasing a portfolio, or launching an online store, a website is often the first step. However, the cost of domain names and hosting services can be a barrier for many, especially beginners or those on a tight budget. Fortunately, there are ways to get free domain names and hosting services. But are they worth it? This article explores everything you need to know about free domains and hosting, including their benefits, limitations, and alternatives.


What Are Domain Names and Hosting?

Before diving into free options, it’s important to understand what domain names and hosting are.

  1. Domain Name: A domain name is the address of your website (e.g., www.yourwebsite.com). It’s what users type into their browsers to access your site. A custom domain name (e.g., .com, .net, .org) is preferred for professionalism and branding.
  2. Web Hosting: Web hosting is a service that stores your website’s files and makes them accessible on the internet. Without hosting, your website cannot be viewed online.

While these services typically come at a cost, there are free alternatives available.


Free Domain Names: What Are Your Options?

Free domain names are usually subdomains or less common domain extensions. Here are some ways to get them:

  1. Subdomains: Many free hosting providers offer subdomains (e.g., yoursite.freehost.com). While these are free, they lack the professionalism of a custom domain.
  2. Free Domain Extensions: Platforms like Freenom provide free domain names with extensions such as .tk, .ml, .ga, .cf, and .gq. These are less common and may not be taken as seriously as .com or .org domains.
  3. Website Builders: Some website builders, like Wix or WordPress.com, offer free subdomains when you create a site with their platform (e.g., yoursite.wixsite.com).

Pros of Free Domain Names:

  • Cost-effective for beginners or personal projects.
  • Easy to set up and use.
  • Ideal for testing or temporary websites.

Cons of Free Domain Names:

  • Lack of professionalism and branding.
  • Limited customization options.
  • May not inspire trust among users.

Free Web Hosting: What’s Available?

Free web hosting services allow you to host your website without paying for server space. Some popular free hosting providers include:

  1. InfinityFree: Offers unlimited disk space and bandwidth, but with limited features and support.
  2. 000WebHost: Provides free hosting with 1 GB of bandwidth and 300 MB of disk space.
  3. FreeHostingNoAds: Offers free hosting with no ads, but with limited resources.
  4. GitHub Pages: A great option for developers to host static websites for free.

Pros of Free Web Hosting:

  • No cost involved, making it ideal for beginners.
  • Easy to set up and use.
  • Suitable for small projects or personal websites.

Cons of Free Web Hosting:

  • Limited storage and bandwidth.
  • Slower website performance.
  • Ads may be displayed on your site.
  • Lack of customer support and advanced features.
  • Security risks due to limited protection.

How to Get Free Domain and Hosting

If you’re interested in getting free domain and hosting, here’s a step-by-step guide:

  1. Choose a Free Hosting Provider: Research and select a reliable free hosting provider like InfinityFree or 000WebHost.
  2. Sign Up for an Account: Create an account on the hosting provider’s website.
  3. Set Up Your Website: Use the hosting provider’s tools to upload your website files or install a content management system (CMS) like WordPress.
  4. Get a Free Domain: If the hosting provider offers a free subdomain, you can use it. Alternatively, register a free domain with Freenom and link it to your hosting account.
  5. Launch Your Website: Once everything is set up, your website will be live and accessible online.

Limitations of Free Domain and Hosting

While free domain and hosting services are appealing, they come with significant limitations:

  1. Lack of Professionalism: Free domains and hosting are not ideal for businesses or professional websites. They may make your site appear less credible.
  2. Limited Resources: Free hosting plans often come with restricted storage, bandwidth, and features, which can hinder your website’s performance.
  3. Ads and Branding: Many free hosting providers display ads on your website or include their branding, which can detract from user experience.
  4. Security Risks: Free hosting services may lack robust security measures, making your site vulnerable to attacks.
  5. No Customer Support: Free plans typically do not include customer support, leaving you to troubleshoot issues on your own.

When Should You Use Free Domain and Hosting?

Free domain and hosting services are best suited for:

  1. Personal Projects: If you’re creating a website for fun or as a hobby, free options may be sufficient.
  2. Testing and Learning: Free hosting is great for testing new ideas or learning how to build websites.
  3. Temporary Websites: If you need a website for a short period, free services can be a cost-effective solution.

However, if you’re running a business, building a professional portfolio, or planning to scale your website, investing in paid hosting and a custom domain is highly recommended.


Alternatives to Free Domain and Hosting

If free options don’t meet your needs, consider these affordable alternatives:

  1. Shared Hosting: Shared hosting plans from providers like Bluehost, Hostinger, or SiteGround are cost-effective and offer better performance and features.
  2. Free Domain with Paid Hosting: Many hosting providers offer a free custom domain for the first year when you sign up for a paid plan.
  3. Website Builders: Platforms like Wix, Squarespace, and Weebly offer affordable plans that include hosting and a custom domain.

Conclusion

Free domain and hosting services are a great way to get started online without spending money. They are ideal for personal projects, testing, or temporary websites. However, they come with significant limitations, including lack of professionalism, limited resources, and security risks. For businesses or professional websites, investing in paid hosting and a custom domain is the better choice.

Ultimately, the decision to use free or paid services depends on your goals, budget, and the type of website you want to build. By understanding the pros and cons of free domain and hosting, you can make an informed decision that best suits your needs.


This article provides a comprehensive overview of free domain and hosting services, helping readers decide whether they are the right choice for their website needs.